Friday, September 13, 2013

Future Projects Friday: Oven mitts and dish towels

Oh man you guys- guess what- it's Friday!! WOOHOOO! And you know what that means, right? It's 'Future Projects Friday' where I show some of the projects I have found on Pinterest that I am interested in trying in the future.

This week's theme has to do with things for your kitchen! With fall just around the corner and Thanksgiving in the not-so-distant future, I am gearing up for using yummy fall ingredients and setting my crockpot up to make nice hearty meals to keep us warm.

Confession: I have actually made 3 of the 4 things selected for today's post. But- I am absolutely in love with each of them and wanted to feature them here for those of you who also like to sew! Additionally, I plan on making a few kitchen-themed gift baskets for Christmas this year (it's less than 4 months away!) so I will be making more again shortly.

1. These Fluorescent tea towels from Brit & Co are number one on my list to make!
[ photo credit: http://www.brit.co/neon-tea-towels/ ]

I love their simplicity and that you can do any design you would like. I scored this 4-pack of white flour sack dish towels for $4 at Target and purchased gray, teal and coral thread from JoAnn's. Can't wait to try this!

[ photo credit: http://gingercake.typepad.com/gingercake/2012/09/easy-oven-mitt-by-trish.html ]
I made this oven mitt last year to include as part of a kitchen-themed wedding gift for friends of ours from grad school. The pattern and tutorial are super-easy to follow and it comes out great.

3. An Oven Hand Mitt from The Idea Room:
This is a different take on an oven mitt and I like it! I feel you can never have enough for some reason so I actually made one of these for myself a while back.
 [ oven mitt in action! ]

[ oven mitt close up ]

I found this project easy as well, though I did have to consult this tutorial for how to use double-fold bias tape, which is different than quilt binding. Be sure to buy the special 'Insul-brite' batting for both this mitt and the one above.

4. Hanging Dish Towels from The Creamer Chronicles:
I have made a few several of these hanging dish towels. I find it both cute and practical. I have given these as house-warming gifts, parts of Christmas presents etc. My sister initially pinned this on Pinterest and I LOVE them. She was the recipient of the first few that I made. I have even made some for our kitchen. I have also made a modified version that can hang on a knob rather than the oven handle so that I could have one closer to the kitchen sink.
 [ hanging dishtowels on our oven ]
 [ modified towel that I made that hangs from the cabinet knob under our sink ]
I highly recommend these as they are both practical and pretty! And, you can make them to match your kitchen or make ones that are seasonally appropriate!

Hope these projects have 'pin-spired' you as much as they have me! Happy Friday!


Monday, September 9, 2013

Collaborative Quilting, part I

In science, collaboration is an essential part of success. Many of the greatest scientific discoveries (e.g. DNA structure, sequencing the human genome) are the result of fruitful collaborations between scientists. It also happens to be one of my favorite parts of the job. Two brains are better than one, right?

Collaboration has played an important part in my scientific career. Sarah is a collaborator of mine and she has played an instrumental role in my career as a scientist. When I was a graduate student and she was a post-doc, she was a mentor and a role model to me and was integral in helping get my project off the ground. Now that she is a university professor and researcher and I am a post-doc at a different university, we don't see each other too often- but that hasn't stopped us from collaborating on several new science projects. And, with Skype, we hold virtual lab meetings so it's almost as if she's still just a few floors away.

So... when Sarah emailed to see if I wanted to collaborate on a quilting project, I jumped at the opportunity!  For years, she has told me about how she loved to embroider and that there were kits where she could embroider quilt squares, which she wanted to try. But, Sarah informed me that she is not a sewer. She started on these embroidered quilt squares when her little girl was born and was now finished with them and needed help putting the quilt together. Sarah mailed me the squares, gave me a budget of $100 for fabrics/notions etc., we discussed some color options and then I got to work!

[ excuse my terrible image of sarah's gorgeous embroidery ]
The dominant colors in this quilt were the light blue seen in the quilt square corners and greens and yellows. Each of the quilt squares (there were 12 in total) was 9" x 9". Sarah and I had discussed using a yellow fabric to form the border around each of the 12 squares. I primarily shop for fabrics at JoAnn's but the timing of this quilt happened to coincide with a rare 25% off SALE (picture me doing jazz hands while saying 'sale') at an amazing quilting fabric store nearby called 'Thimble Pleasures'. I got to go fabric shopping with two of my good friends Heather and Allison--my crafting partners in crime--which made fabric hunting even more fun! Working within the budget that Sarah set, I purchased most of my fabrics at Thimble Pleasures, with the exception of part of the backing and the batting, which I was able to get at JoAnn's for less. After Sarah and I had discussed using yellow for the border fabric, I knew I wanted to choose a yellow with a subdued pattern because I wanted her embroidered squares to shine.

[ close up of the yellow border fabric ]

One of the things that Sarah and I discussed was that she wasn't super into pinks/purples/uber-girly things for her daughter. I kept this in mind when picking out the fabrics. I think by choosing fabrics that weren't overtly juvenile, it allows this quilt to grow with Sarah's daughter, rather than appearing as a baby blanket she might have to retire in a few years. For the outer border, I chose a green fabric that Heather spotted. This fabric had yellow and red accents, which were all predominant colors in the quilt squares and it nicely tied in the yellow of the first border. Additionally, it had small white flowers that were similar to those in the yellow fabric.

[ close up of the outer border fabric ]

The quilt squares came as a part of a kit and therefore came with instructions for quilting them (yippee!)! It was interesting to read the instructions as they were likely written by someone who embroiders and not a quilter. In quilting, a 1/4" seam allowance is relatively standard, but for this quilt they requested a 3/8" seam allowance instead. I liked using the larger seam allowance- I often worry with a 1/4" (or scant 1/4" for some quilts) seam allowance that after repeated washings, the seams will come apart. Somehow that extra 1/8" seems like added security?

[Also, as an aside, there is too much math in quilting- Heather and Allison can attest to the fact that there was complicated math involved in figuring out how much backing fabric to use. Math is not my strong suit and I do not enjoy it! My grandmother, who taught me most of what I know about sewing and whose machine I still sew with, was a high school math teacher and tutored me in math through college. She was a very influential person in my life and she is likely rolling in her grave that I have publicly proclaimed on the internet that I loathe math. Sorry Mimi!]

[ exhibit A. math is hard...don't judge me ]

I chose a light blue fabric for the binding, which was roughly the same color as the blue Sarah used in the corners of each square. I love choosing binding fabrics that add a bright pop of color!

[ binding fabric ]
I opted not to purchase the backing fabric right away. I was initially super in love with this chevron flannel fabric from Riley Blake, but after the quilt was put together, I ultimately decided that it was a bit too masculine. It made me glad that I waited until the quilt top was put together before choosing the backing fabrics.

Stay tuned next week for part II: A tutorial for putting the quilt together!


Friday, September 6, 2013

Future Projects Friday: Baby gifts


I may or may not have a slight addiction to Pinterest (my hubby might tell you it's a full-blown addiction requiring an intervention and a trip to a fancy rehab hospital...).  I love looking at the 'DIY & Crafts' section to see what projects catch my eye. I am always on the look-out for good tutorials or projects. I thought I might dedicate Fridays on this blog to featuring two or three of the posts/tutorials that are potential future projects I might want to try. Maybe you'd be interested in them too?

      Recently, most of the projects that catch my eye tend to be on the simple and quick side. While I have enjoyed sewing large quilts (e.g. king size bed spreads) or highly technical projects involving lots of time and patience (like this cathedral window technique), I find myself with a limited amount of time and focus to dedicate to sewing these days.

[ top image: cathedral window quilt, that I affectionately called the 'god-forsaken quilt' because it took.forever.to.finish. bottom image: the quilt I made as a wedding gift for my best friend ]

      There is something extremely gratifying about being able to finish a project in a timely manner. I think this has a lot to do with my profession as a biologist. In developmental biology, my field of specialization, my experiments often take at least a week or more to complete (I dedicate far more time caring about whether or not fish mate than should be considered appropriate). And, despite these week(s)-long experiments, there is no guarantee that the end results will be good/useable/useful. Additionally, experiments are often additive and the result from one experiment is just a small piece in a very large puzzle that is not yet close to completion. When I feel like I am in the weeds, I often remind myself of this quote from Theobald Smith: 'The joy of research must be found in the doing, as every other harvest is uncertain'. So, when it comes to sewing, I love the fact that if I dedicate time and effort to a project and follow the directions, I can anticipate what the final project will look like and roughly how long it will take me.

     Fortunately, several of my friends and family members have had or are having babies, which means that short and sweet baby gifts are the perfect projects to work on! Here are some links to tutorials for baby gifts I am considering making for those special friends still expecting:

1. An adorable swaddler from Makezine.com: The Snuggler
[ photo credit: http://makezine.com/craft/craft_pattern_podcast_snuggler/ ]
How adorable is this swaddle? While my hubby and I do not have kiddos yet, I know these are super popular among new parents these days- my facebook feed is filled with praise for swaddling!

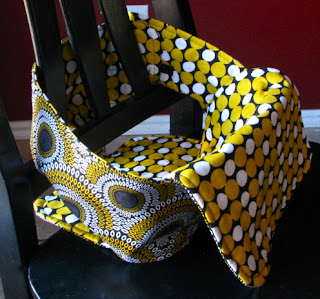
2. The 'Anywhere Chair' from Made by Marzipan: Anywhere Chair
[photo credit: http://www.madebymarzipan.com/?x=2038 ]
I absolutely love love love the fabric choice on this project and I think it would be a useful/functional gift for new parents!

3. Little Lion Taggie Toy from mmmCrafts: Taggie Toy
[ photo credit: http://mmmcrafts.blogspot.com/2011/03/dont-look-kristyn.html ]
This is mmmCrafts's spin on a tutorial for a taggie toy posted from Chez Beeper Bebe's blog. I just love the little lion face and think it would make a cute addition to a baby gift for someone.

I am still trying to figure out how to add a 'pinterest' button to this space so that you are able to link to my pinterest boards and explore what I have pinned- suggestions on how to do this are welcome! Hope these projects bring a little inspiration to your weekend! Happy Friday!

PS- here's a sneak peak at the quilt I am featuring on next week's post, 'collaborative quilting':


Tuesday, September 3, 2013

Heirloom Chenille Baby Blanket

This is my first post here at Quilting in vivo. I created this blog as a space to record quilts and projects that I have sewn and to document the process by which they were made. With the invention of Pinterest, my quilting has ramped up significantly thanks to an easy way to find and store tutorials for projects. As a biologist, I thrive on protocols- directions for how to perform an experiment from start to finish. Well-written protocols are absolutely essential to experimental success. When trying a new-to-me experiment, I enjoy looking at several protocols and taking the best information from each one to create a custom protocol (this often takes many tries/variations). The same goes for sewing- I find protocols tutorials online and put my own spin on them, adapting them for my set up and specific needs. Perhaps some of the tips and tricks I have found that work may also be of interest to you?

     This quilt arose when I found out that a dear childhood friend of mine had a little baby girl. H. and I grew up across the street from one another and went to school from grade school through 12th grade- we even got tattoos together when we turned 18 (much to her older police officer brother's dismay I might add...)! H. is a world traveler- she went to college in New Zealand (where she met her husband) and has traveled all over the globe. H. and her hubby now live in Switzerland and although we don't get to see each other often, the internet makes keeping in touch much easier!

     To celebrate H.'s new baby, I knew I wanted to make a quilt of some sort. To find inspiration, I trolled through my Pinterest board, 'sewing fun', for inspiration. This tutorial for an heirloom chenille baby blanket from Aesthetic Nest (Aesthetic Nest baby blanket) had caught my eye a few weeks back and I had been dying to try the technique. I have a great propensity to stock up on hoard fabric remnants from the remnants bin at JoAnn Fabrics. I had this lovely gray/purple/green flower print home decor fabric that I thought would be perfect- not too girly, with a bit of a modern flair.

[ ironing fun ]
   I also had several different remnants (all from JoAnn's) of pink-themed flannels for the backing of this blanket. The tutorial called for three different flannel pieces. Again, I chose these fabrics from my remnants stock pile.

[ flannels from my stash ]
     While the tutorial used a 45"x45" cut of fabric, I used something slightly smaller, about 36"x42" primarily because some of my remnants were smaller than the 45"x45" mentioned.  I layered the flannels such that the light pink with gray fabric was the top layer, the dark pink was in the middle and the light pink with birdies (hard to see in this photo) was the bottom layer, closest to the front fabric.
    
     After ironing all fabrics, I squared the fabrics up to the size of the smallest fabric piece that I had, keeping the front/home decor fabric a bit larger than the flannel pieces as advised by the tutorial. If you have never squared up fabrics before, this is a fantastic tutorial. I then pinned all of the fabrics together with straight pins and used my ruler and a blue washable fabric marker (this exact one) to draw a line on the flannel side at a 45° angle from the bottom left corner to the right side of the fabric. Because I used a rectangle instead of a square like in the tutorial, I probably should have drawn two guide lines to keep things extra straight but it ended up working out just fine.
 [ all squared  up and ready to go ]
After pinning the fabric and drawing the guideline on the flannel side, I used my walking foot to stitch along the line. As the tutorial recommended, I then flipped my fabric over and sewed the remaining lines on the home decor fabric side, since those stitches will be visible. I quilted my lines 1/2" apart, which was exactly the width of my walking foot.
 [ the quilting begins ]
I quickly discovered that straight pins were not the best way to keep the fabrics together, mainly because I kept pricking myself with them, so I switched to safety pins (like you would use to baste a quilt together) mid-way through.
[ safety pins > straight pins ]
Stitching the straight lines was easy, but felt like it.took.forever. I ended up stitching all of the lines in two 1.5 hour shifts.
[ rows and rows and rows ]
 For some reason, a few of my lines had a slight curve to them, but I knew once I trimmed all of the flannel on the back, it would not be very obvious. In the tutorial, she recommends using either scissors or a nifty little fabric cutting tool from Olfa. I was tempted to purchase it, but on a post-doc stipend, I knew it wasn't a wise purchase since I won't be making these blankets all time.
[ Goldilocks and the three scissors? ]
I have three pairs of sewing scissors (all Gingher brand). I felt like Goldilocks trying to pick the correct pair of scissors for cutting the flannel. The biggest pair was too big and didn't fit well in the 1/2" channels I had sewn. The middle pair would have been perfect, but after years of abuse, they are quite dull and didn't handle the three layers of flannel well. So, I ended up using the smallest pair (which are also my newest, and therefore sharpest) to trim each channel. Overall, the scissors worked fine and I didn't regret not purchasing the special chenille cutter.
[ snip snip ]
Fortunately, trimming the channels went much more quickly than sewing the lines to create them. In the magnified view above, you can see how the front fabric is slightly larger than the flannel fabrics- this makes it much easier to just trim through the flannel 'channels' and not accidentally clip your front fabric (*I had nightmares I might actually do that after the hours and hours of straight line sewing).
[ after the cuts ]
After cutting all of the channels, you need to square up the quilt. This is another great tutorial if you have never squared a quilt up before. Once the quilt is squared up, you will need to bind it. I loathe binding. It is a mental battle every.single.time. I only machine bind because I lack the patience and time for hand sewing. I have tried several different binding tutorials (found here, here and here) and while all of the different approaches work, it drives me bonkers that some sort of error is always visible. If I start the binding on the back of the quilt, and wrap it to the front of the quilt (like this), inevitably my stitching is crooked, doesn't always stay on the binding and meanders onto the backing fabric. If I start my binding on the front of the quilt (like this), and wrap it to the back of the quilt while stitching the ditch between the binding and the quilt top, I often don't 'catch' the binding on the back- and I won't even go into how bad my mitered corners turn out. But I digress... For this quilt, however, I knew putting the binding on the back to start and wrapping it to the front would be the best approach. By stitching the binding down on the front side, any meandering/crooked stitches on the back side of the quilt will essentially be hidden by the ruffled flannel.


[ binding binding binding ]
I chose an ivory flannel (again from my remnants stash) for the binding. Then came time for the magical part- turning the backing from cut-up flannel to cute and soft ruffles. I should note that none of my fabrics were pre-washed. In the tutorial, she did not pre-wash her fabrics, though she did say she received comments from folks whose fabrics bled during the first wash. I washed the blanket with a few towels on warm and even after the wash, you could see the change starting to happen!
 [ fresh out the washer ]
Then, I dried the quilt on regular heat and I was amazed at the finished project. It looked soft and cuddly and exactly like the tutorial at aesthetic nest said it would!

 [ voila! ]
I was very pleased with the final product and would definitely make this again. Next time, I think I would choose a solid flannel for the top piece of the backing- the gray circles looked a little odd/hard to recognize once the fabric was washed. I combined this blanket with a swaddle blanket (using this tutorial and 1 yard of gauze fabric I scored in the remnants bin at JoAnn's a few weeks ago) and a sweet little giraffe stuffed animal (unfortunately the link for this tutorial is no longer active!).